
Recognize the Rembrandt triangle
Look on the side of the face away from the key light. A small lit area sits beneath the eye, surrounded by the nose shadow and the cheek shadow. It should follow the cheek’s surface, with a gentle transition into shadow.
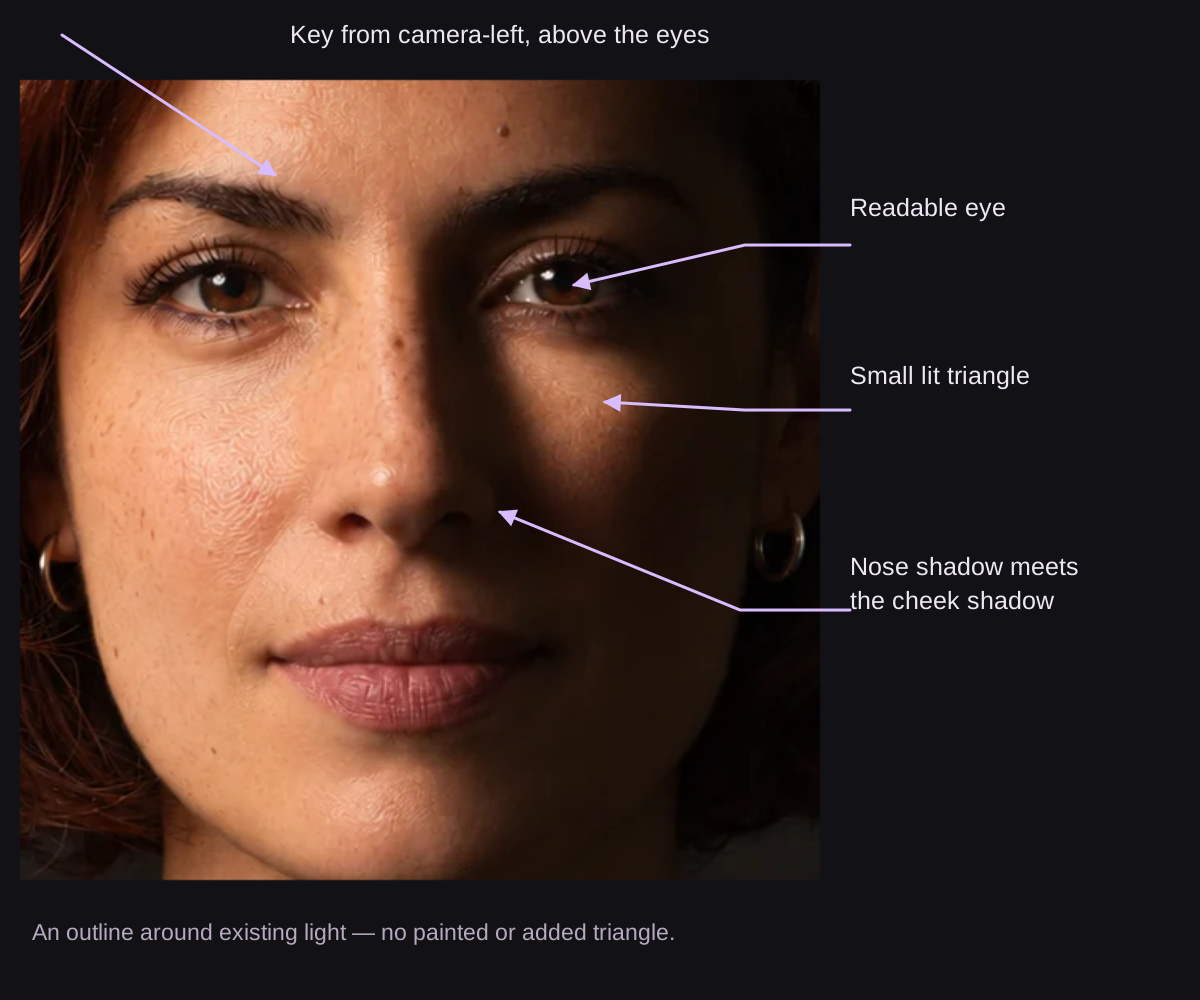
Start with the light above eye level and to one side. Then adjust the light or the face direction until the shadows connect. A broader source softens the boundaries; a head turn changes where those boundaries fall.
A starting arrangement, not a fixed rule
The diagram places the key roughly 45° to camera-left and above the eyes. On another face, a slightly different position may create a clearer triangle. Use the facial result to refine the setup.
Edit This Lighting Setup →Rembrandt vs Loop vs Soft Front Lighting
These original AI lighting studies use the same fictional adult creator, dark knit top, background, pose and portrait framing. Compare the facial shadows rather than the overall brightness.



Rembrandt vs loop lighting: follow the nose shadow. If it joins the cheek shadow and encloses a small lit patch, it reads as Rembrandt. If it stops short of the cheek shadow, it reads as loop. Soft front lighting reduces that side-to-side contrast and keeps both cheeks more evenly lit.
Rembrandt Lighting: setup and prompt
Use it for: Character portraits, music artwork and expressive creator profiles.
Check the result: Look for a connected nose and cheek shadow, a small lit triangle, and a readable shadow-side eye.
Begin with the key to one side and above the eyes. Move it until the nose shadow meets the cheek shadow without losing the darker eye.
Create a chest-up portrait of an original fictional adult creator, age 30 or older, against a matte charcoal backdrop. Use the selected adult character reference when supplied; preserve face shape, complexion, hair and distinguishing features. Keep the outfit, relaxed pose and eye-level camera consistent. Rembrandt Lighting. The nose shadow meets the cheek shadow, leaving a lit triangle beneath the eye on the darker side. Keep the nose shadow connected to the cheek shadow, leaving a small triangle of light below the shadow-side eye; preserve iris and eyelid detail. Place the dominant key from camera-left, about 45° off the camera axis in front of the subject, above eye level, angled gently down (30° elevation), using a moderately diffused source with readable shadow edges and neutral daylight-colored light at 5600 K. No separate fill source; retain dark-side detail through restrained ambient light. No separate rim light or artificial halo. Natural skin texture, believable catchlights and facial proportions. Keep the background quieter than the face. One photograph using the selected output aspect ratio; no text or collage.
Loop Lighting: setup and prompt
Use it for: Everyday creator portraits, personal branding and approachable headshots.
Check the result: The nose shadow should be short, slightly downward and clearly separate from the cheek shadow.
Bring the key closer to the camera axis than in the Rembrandt setup. Look for a short nose shadow with a visible gap before the cheek shadow.
Create a chest-up portrait of an original fictional adult creator, age 30 or older, against a matte charcoal backdrop. Use the selected adult character reference when supplied; preserve face shape, complexion, hair and distinguishing features. Keep the outfit, relaxed pose and eye-level camera consistent. Loop Lighting. A slightly off-center light makes a small nose shadow that stops before it reaches the cheek shadow. Place the dominant key from camera-left, about 25° off the camera axis in front of the subject, above eye level, angled gently down (20° elevation), using a moderately diffused source with readable shadow edges and neutral daylight-colored light at 5600 K. No separate fill source; retain dark-side detail through restrained ambient light. No separate rim light or artificial halo. Natural skin texture, believable catchlights and facial proportions. Keep the background quieter than the face. One photograph using the selected output aspect ratio; no text or collage.
Soft Front Lighting: setup and prompt
Use it for: Beauty content, commercial headshots and clear, friendly profile images.
Check the result: Both eyes and cheeks should be readable, with gentle nose and chin shadows rather than a bright, flattened face.
Use a large diffused source near the camera axis, slightly above eye level. Keep gentle modeling beneath the nose and chin.
Create a chest-up portrait of an original fictional adult creator, age 30 or older, against a matte charcoal backdrop. Use the selected adult character reference when supplied; preserve face shape, complexion, hair and distinguishing features. Keep the outfit, relaxed pose and eye-level camera consistent. Soft Front Lighting. A large source close to the camera axis lights both cheeks evenly while retaining natural skin texture. Place the dominant key on the camera axis, above eye level, angled gently down (10° elevation), using a large diffused source with soft shadow transitions and neutral daylight-colored light at 5600 K. No separate fill source; retain dark-side detail through restrained ambient light. No separate rim light or artificial halo. Natural skin texture, believable catchlights and facial proportions. Keep the background quieter than the face. One photograph using the selected output aspect ratio; no text or collage.
What happens when you add more fill?
Fill brightens the shadow cheek. A little can recover eye detail; too much reduces the difference between the triangle and the surrounding cheek. The key may stay in the same position while the Rembrandt pattern becomes less distinct.

How to Create Rembrandt Lighting
- Choose one adult identity reference. Keep the same saved character, expression, wardrobe, background and eye-level framing across variations.
- Put the key to one side and above the eyes. Begin around a three-quarter front position; aim toward the face rather than straight across the set.
- Describe the shadow connection. Ask for the nose shadow to meet the cheek shadow, enclosing a small triangle beneath the darker eye.
- Keep fill restrained. Preserve some iris, eyelid and cheek detail without lifting the whole dark side to the key’s brightness.
- Inspect, then change one thing. If the triangle is missing, adjust the key direction, height or fill before changing unrelated styling.
Use the Lighting Diagram Maker to plan the relationship between the lights. For the broader scene, wardrobe and camera brief, use the AI photoshoot prompt guide.
Best AI Portrait Lighting Prompts
The most useful lighting prompt describes a visible result: which cheek is darker, where the nose shadow ends, what happens beneath the eye, and how much fill remains. Name the pattern once, then describe its defining detail.
- Rembrandt: “The nose shadow joins the cheek shadow, enclosing a small triangle of light below the shadow-side eye.”
- Loop: “A short downward nose shadow remains separate from the cheek shadow.”
- Soft front: “A broad source near the lens axis lights both cheeks gently, with shallow nose and chin shadows.”
Add those instructions to a specific adult subject, setting and crop. Avoid stacking several competing patterns in one request. The AI influencer prompt generator helps organize the rest of the scene; the full lighting prompts above are ready to copy.
Common AI Lighting Mistakes
- Both cheeks look equally bright. Reduce fill and move the key farther from the camera axis.
- The shadow-side eye disappears. Lower a very high key slightly, or add a small amount of fill while watching the triangle’s contrast.
- The cheek has a white geometric patch. Ask for light following the face’s contours, with a gradual shadow boundary and natural skin texture.
- A rim turns into a glowing outline. Reduce it and specify hair and shoulder edges rather than a halo.
- The face changes between examples. Return to the same original identity reference instead of using each new variation as the next reference.
- Color instructions fight each other. Choose a clear key color first. Add a differently colored rim only when that separation is part of the intended look.
How to Fix a Missing Rembrandt Triangle
First identify what you see. A short isolated nose shadow is closer to loop lighting; ask for that shadow to extend toward the cheek shadow. An evenly lit face needs more side direction or less fill. A fully dark cheek may need a small head turn or a slight light adjustment to let light reach beneath the eye.
Try this focused instruction: “Keep this exact adult face, expression, outfit, pose and framing. Adjust only the key and fill so the nose shadow joins the cheek shadow, leaving a small natural triangle of light beneath the shadow-side eye. Preserve eye detail.”
For an existing portrait, open the AI photo editor with your authorized reference. Inspect the new face and shadows before accepting the edit.
How to Preserve the Same AI Influencer Identity
Lighting changes how a face appears, especially around the nose, cheekbones and jaw. Anchor identity with the same saved AI influencer or adult reference and keep the model, head direction, wardrobe and crop consistent. Create each comparison from that original reference.
In Studio, choose your saved character before generating. Review the eyes, hairline, face proportions and distinguishing features as well as the shadows. A matching written description alone cannot lock identity as reliably as a reference-led workflow.
Use the AI influencer image generator for the portrait workflow, or edit a Rembrandt setup before opening Studio.
Frequently Asked Questions
What is Rembrandt lighting?
Rembrandt lighting is a portrait pattern with a small triangle of light on the darker cheek. The nose shadow joins the cheek shadow while leaving that triangle beneath the shadow-side eye.
Does the key light have to be exactly 45 degrees?
No. About 45 degrees to one side and above eye level is a useful starting point. Face shape, head direction, source size and fill determine whether the triangle appears. Judge the visible shadows.
What is the difference between Rembrandt and loop lighting?
Rembrandt connects the nose shadow to the cheek shadow. Loop lighting leaves a shorter nose shadow separate from the cheek shadow, usually producing a more open-looking face.
Can Rembrandt lighting use a softbox?
Yes. A moderately diffused source can preserve the triangle with gentler edges. A very broad frontal source or strong fill may make the triangle difficult to distinguish.
Why does my AI portrait have no Rembrandt triangle?
The key may be too frontal, the fill too strong, or the model may have interpreted the lighting loosely. Describe the connected shadows and the small lit triangle explicitly. Keep the face direction fixed and change one lighting instruction at a time.
How do I keep the same AI influencer across lighting changes?
Use the same saved adult character or identity reference, model, framing, outfit and pose. Make each lighting variation from that same reference rather than repeatedly editing the previous result.
Explore portrait lighting
Design your own lighting setup →
For physical-light placement examples, see Profoto’s Rembrandt lighting tutorial and Westcott’s loop lighting guide.
Plan Content
Measure Engagement
Build Your Profile
Price Your Work
Write Post Copy
Brand Partnerships